
How to Make a Bilingual Site|Create a Multilingual Site in WordPress
2016/01/31
I changed this site “Backyard Lawn” into a bilingual site in January 2016. I will explain the process.
- The WordPress is used for creating this blog.
- The theme is “Stinger5”.
- The actual server of this blog is XSERVER, but the most of the instruction images in this article were reproduced in a local environment.
Contents
- 1 Setup of the Multisite (=Network) in the WordPress
- 2 Duplicate the Contests into the “Sub Site (English Site)”
- 3 Translate the Contents
- 4 Installation and Setup of the “Multisite Language Switcher”
- 5 Install the “Language Switch” and Change its Design
- 6 Delete the “/blog” in the Permalink of the “Main Site (Japanese Site)”
Setup of the Multisite (=Network) in the WordPress
Setup the multisite (=network) in the WordPress at first.
Because the setup requires the “deactivation of all the plugins” during the process, deactivate them before starting.

Select “Plugins” → “Installed Plugins” page in the left sidebar. “Deactivate” all the plugins.
Change the theme to the default WordPress theme, just in case.
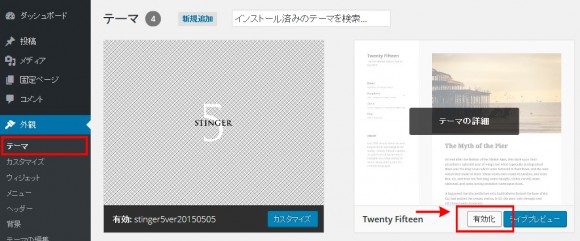
Select “Appearance” → “Themes” page in the left sidebar. “Activate” a default WordPress theme. “Twenty Fifteen” was used this time.
Because the “wp-confing.php” file and the “.htaccess” file need to be edited, backup them in advance.
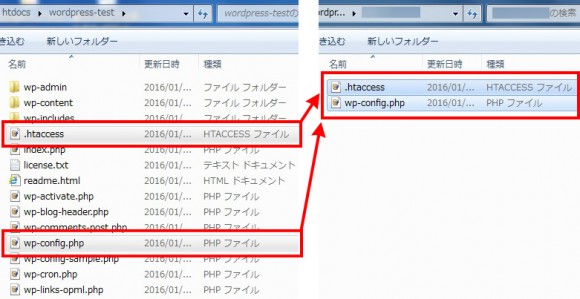
Copy the “wp-confing.php” file and the “.htaccess” file to wherever you like.
- Above files are found in a folder where you installed WordPress. Though they are in the “xampp” → “htdocs” → “wordpress-test” in case of this local environment, they are in the “your domain name” → “public_html” in case of the XSERVER.
- The files starting with “.” (a dot) are deemed as the hidden files and sometimes not visible. We need to change the setting of the FTP software and “show hidden files” in that case.
Add the following one line in the “wp-confing.php” file.
define( 'WP_ALLOW_MULTISITE', true );
Add it above the line that says “ /* That’s all, stop editing! Happy blogging. */ ”.
It will become as follows.

The previous one line was inserted between the line “ define(‘WP_DEBUG’, false); ” and the line “ /* That’s all, stop editing! Happy blogging. */ ”.
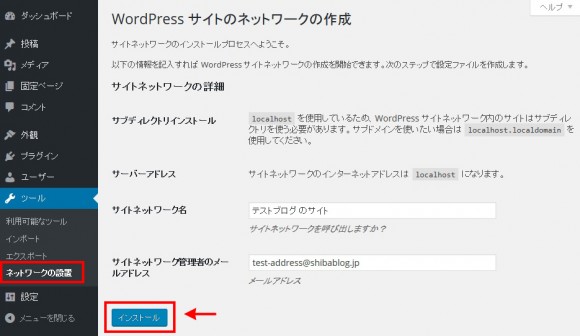
After logging into WordPress again, open the page of “Network Setup”, which appears in the “Tools” in the left sidebar. Fill the “Network Title” and “Network Admin Email”. (These information can be changed afterwards.) Click on the “Install”.
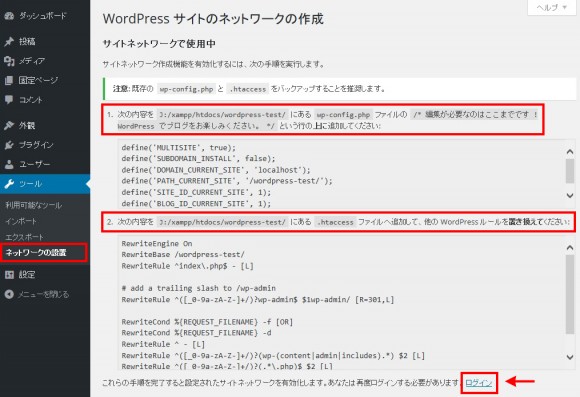
After the page is transferred, edit the “wp-confing.php” file and the “.htaccess” file according to the instructions in the red boxes. (I will explain this in more detail later again.)
- The location of the “wp-confing.php” file and the “.htaccess” file is as explained before.
- It is in the “xampp” → “htdocs” → “wordpress-test” in case of this local environment, and is in the “your domain name” → “public_html” in case of the XSERVER.
In the first red box, there is the following instruction.
1. Add the following to your “wp-config.php” file in “a folder where you installed WordPress” above the line reading “ /* That’s all, stop editing! Happy blogging. */: ”
define('MULTISITE', true);
define('SUBDOMAIN_INSTALL', false);
define('DOMAIN_CURRENT_SITE', 'localhost');
define('PATH_CURRENT_SITE', '/wordpress-test/');
define('SITE_ID_CURRENT_SITE', 1);
define('BLOG_ID_CURRENT_SITE', 1);
Please copy the above code from your own dashboard, or please replace the 3rd line, the part of “DOMAIN” (= localhost) and 4th line, the part of “PATH” (= wordpress-test) with your own information if you are copying the above.
- Only the “sub-directory install” can be selected in case of local environment like this. The second line shows “ define(‘SUBDOMAIN_INSTALL’, false); ” in this situation.
- On the contrary, only “sub-domain install” can be selected when more than one month has passed after the installation of the WordPress in usual remote environment. The second line shows “ define(‘SUBDOMAIN_INSTALL’, true); ” in this situation.
- In case of this blog, more than one month had passed after the installation of the WordPress in remote environment. We can replace above “true” with “false” and write it into “wp-confing.php” file when we still want to install with “sub-directory”.
It will become as follows.
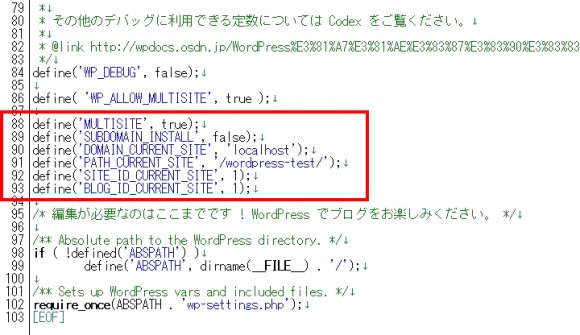
It was inserted between the before-mentioned line “ define( ‘WP_ALLOW_MULTISITE’, true ); ” and the line “ /* That’s all, stop editing! Happy blogging. */: ”.
In the second red box, there is the following instruction.
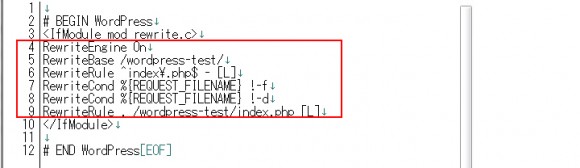
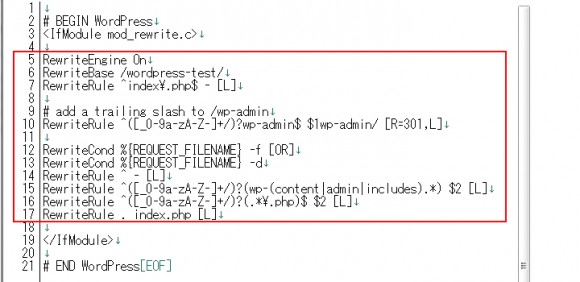
Add the following to your “.htaccess” file in “a folder where you installed WordPress”, replacing other WordPress rules:
RewriteEngine On
RewriteBase /wordpress-test/
RewriteRule ^index\.php$ - [L]

# add a trailing slash to /wp-admin
RewriteRule ^([_0-9a-zA-Z-]+/)?wp-admin$ $1wp-admin/ [R=301,L]

RewriteCond %{REQUEST_FILENAME} -f [OR]
RewriteCond %{REQUEST_FILENAME} -d
RewriteRule ^ - [L]
RewriteRule ^([_0-9a-zA-Z-]+/)?(wp-(content|admin|includes).*) $2 [L]
RewriteRule ^([_0-9a-zA-Z-]+/)?(.*\.php)$ $2 [L]
RewriteRule . index.php [L]
Please copy the above code from your own dashboard, or please replace the 2nd line, the part of “RewriteBase” (= wordpress-test) with your own information if you are copying the above.
- We can edit the “wp-confing.php” file and the “.htaccess” file at the same time if the creation of a site network becomes the “sub-directory install” from the beginning.
- However, the code of “.htaccess” is altered if we change the creation of a site network from the “sub-domain install” to the “sub-directory install” (replace “ define(‘SUBDOMAIN_INSTALL’, true); “ in “wp-confing.php” with “ define(‘SUBDOMAIN_INSTALL’, false); ”.
- In that case, we need to edit the “wp-confing.php” first, logged in the WordPress again, and then copy/paste the code for the “.htaccess”.
This is the “.htaccess” file before editing.
Replace inside the red box with the above-mentioned coed.
This is the “.htaccess” file after editing.
The code inside the red box was replaced.

After logging into the WordPress again, there displayed “My Sites” in the top left, and “Network Admin” in it. Please open its dashboard.
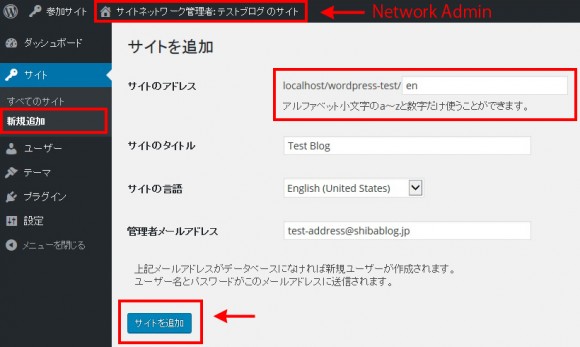
From the dashboard of “Network Admin”, open the “Sites” → “Add New” page in the left sidebar. Fill in the “Site Address” with a “sub-directory name”. I entered “en” because I created an English site. (The Site Addresses (i.e. site URLs) can’t be changed once created.) Fill also in the “Site Title”, “Site Language”, and “Admin Email”. (These information can be changed afterwards.) Click on the “Add Site”.
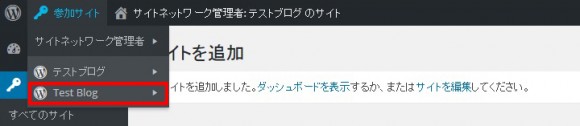
The new site “Test Blog” is displayed in the “My Sites” in the top left.
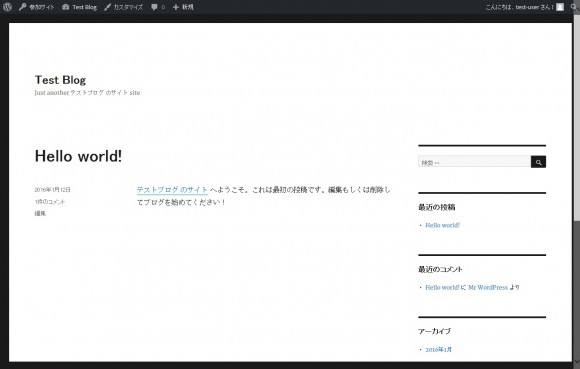
This is the top page of the new site “Test Blog”.
Copy the contents of the original site (main site, Japanese site) to this new site (sub site, English site) and then, translate the sentences from the Japanese to the English. (It is faster and easier than creating a new English site from zero.)
Duplicate the Contests into the “Sub Site (English Site)”
Export the contests of the main (Japanese) site.
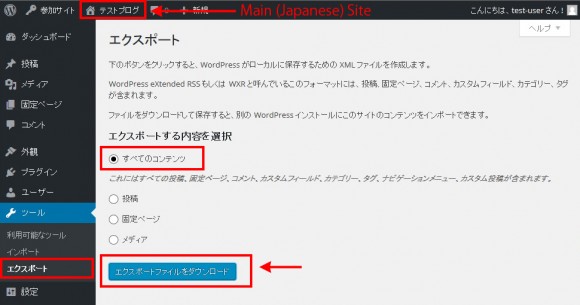
In the dashboard of the main (Japanese) site, open the “Tools” → “Export” page in the left sidebar. Select “All content” and click on the “Dwonload Export File”.
- “All content” will contain all of your posts, pages, comments, custom fields, terms, navigation menus and custom posts, as shown in the screen.
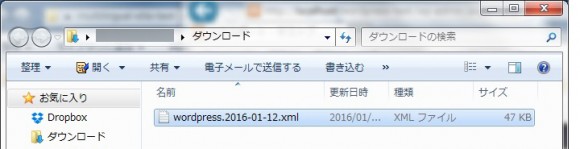
“Save” the file.

Save the exported xml file in any folder you like.
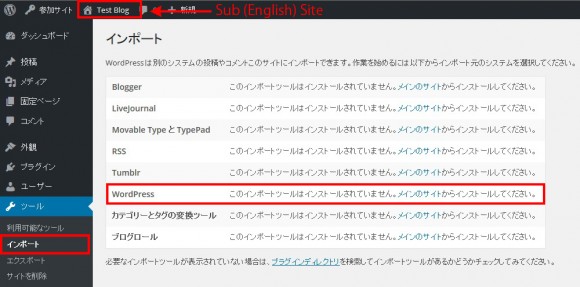
Though the exported xml file is being imported in the sub (English) site, from the “Tools” → “Import” page using “WordPress importer”, it says that “This importer is not installed. Please install importers from the main site.” at first.
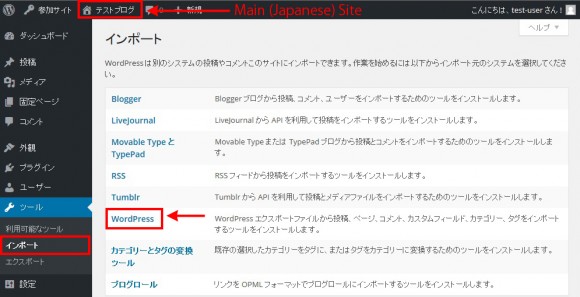
In the main (Japanese) site, go to the “Tools” → “Import” page, and click on the “WordPress”.
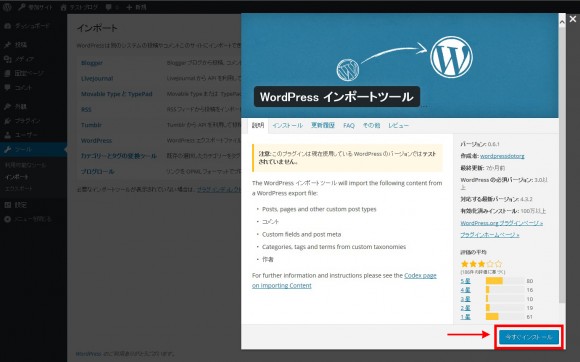
This will open the install screen. Click on the “Install Now”.
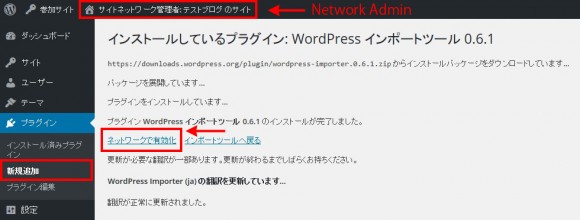
After moving the screen above, click on the “Network Activation”.
- New installation of common plugins can be made only from the “Network Admin” screen, after setting the site network.
- Activation of plugins is achieved collectively from the “Network Admin” screen using the “Network Activation”, or separately in each site using the “Activate”.
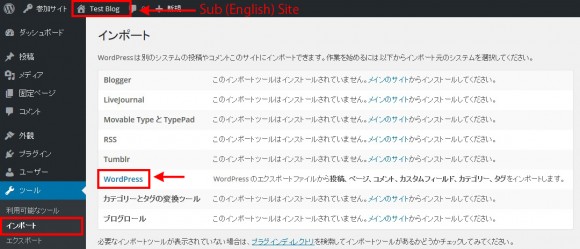
Go back to the sub (English) site, open “Tools” → “Import” page, and click on the “WordPress”.
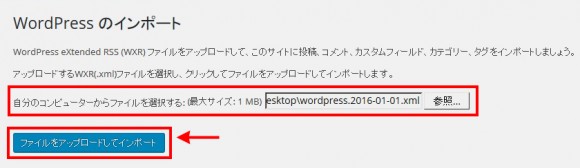
In the screen above, select the xml file, which has been exported from the main (Japanese) site previously. Click on the “Upload and Import File”
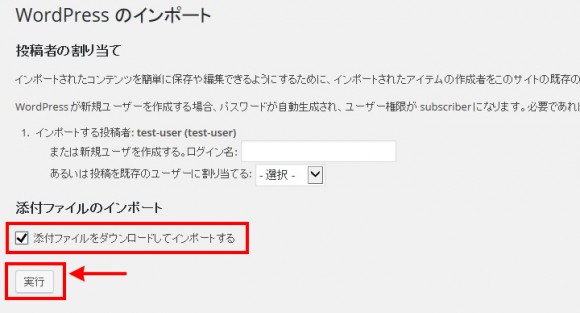
Check the “Download and import file attachments.” Click on the “Submit”.
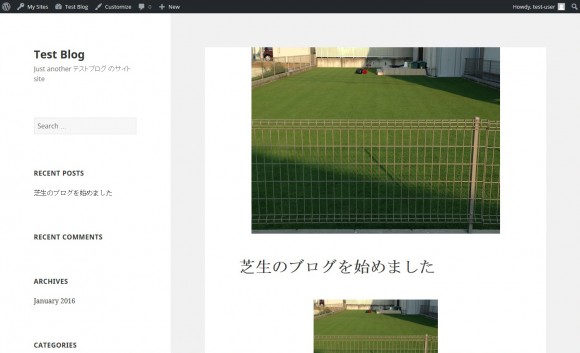
The contents of the main (Japanese) site is copied into the sub (English) site.
- Images in the posted articles were not displayed at first, when I imported the contents of this blog (Backyard Lawn) in the remote environment.
- Although the image size had been resized using a “Regenerate Thumbnails” plugin previously in this blog, image size was not changed in the imported contests.
- The images were displayed properly, after resizing the image size again using “Regenerate Thumbnails” from the dashboard of the sub (English) site.
Translate the Contents
The imported contents such as posted articles are, of course, still in Japanese. They need to be translated into English. There are following three ways to translate.
- Translate by ourselves.
- Ask somebody to translate. (We can find a lot of translation services agencies in internet.)
- Use a translation software. (However, is you are satisfied with the accuracy of the translation software, you can complete a multilingual site in an instant, only by installing “Website Translator” of “Google Translate”, without any effort.)
Although the automatic translation has much improved, it seems still difficult for computers to translate Japanese into other languages.
Installation and Setup of the “Multisite Language Switcher”
Then, install the “Multisite Language Switcher”.
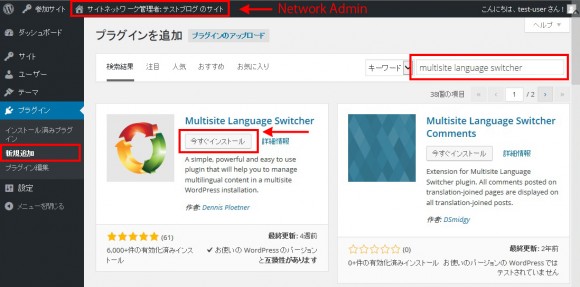
In the “Network Admin” dashboard, open “Plugins” → “Add New” page. Type “Multisite Language Switcher” in the “Search Plugins” and run the Search. Click on the “Install Now”.
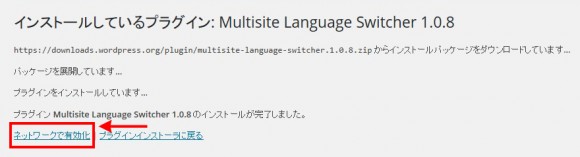
Click on the “Network Activate”.
- If the multisite (=network) feature is not activated at this point, it says that “The Multisite Language Switcher needs the activation of the multisite-feature for working properly.” and we can’t proceed until we activate the multisite (=network) feature.
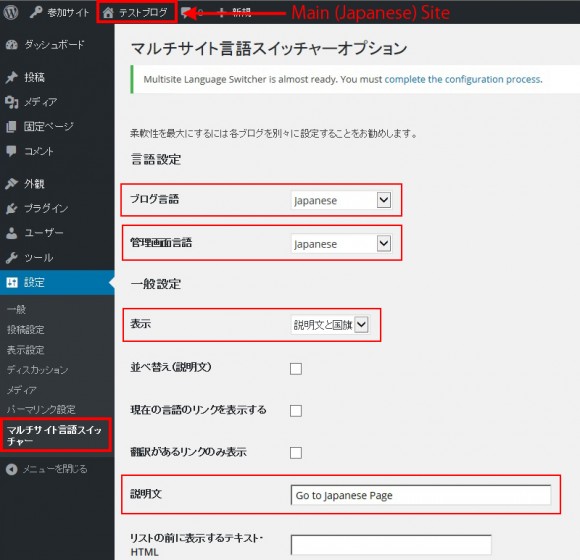
From the dashboard of the main (Japanese) site, open the “Settings” → “Multisite Language Switcher” page and input the setting. (The information can be changed afterwards.)
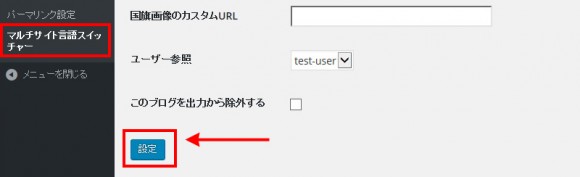
Click on the “Update” in the bottom of the above page. (We need to click on the “Update” even if we do not have any modification in the setting items.)
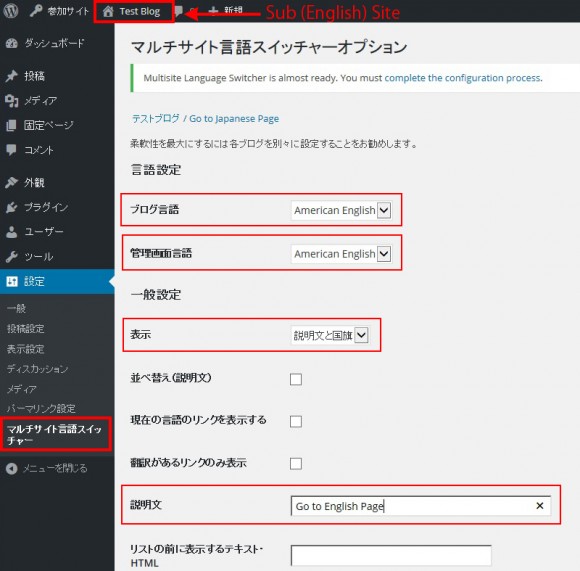
From the dashboard of the sub (English) site, open the “Settings” → “Multisite Language Switcher” page and input the setting. (The information can be changed afterwards.)
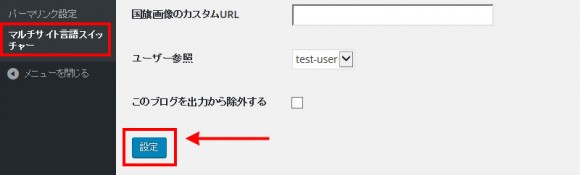
Click also on the “Update” in the bottom of the above page. (We need to click on the “Update” in both the main (Japanese) site and the sub (English) site even if we do not have any modification in the setting items.)
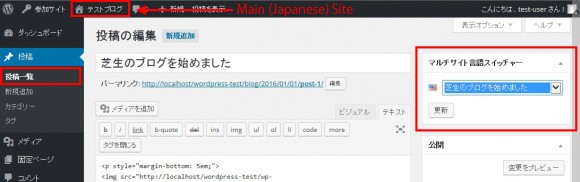
Open “Posts” → “All Posts” and then “Edit” (or “Add New”) screen, connect the related posts in other languages from the menu of the Multisite Language Switcher in the top right. Connect “Categories” and “Tags” to the related items in other languages from each setting screen.
Install the “Language Switch” and Change its Design
Then, install the “Language Switch” by describing the following sentence.
<?php if ( function_exists( 'the_msls' ) ) the_msls(); ?>
Although the easiest method is to paste the above sentence in a text widgets, it does not attract so much attention. The above sentence was written in the “header.php” of a WordPress theme this time.
Activate the theme “Stinger5”, which I usually use.
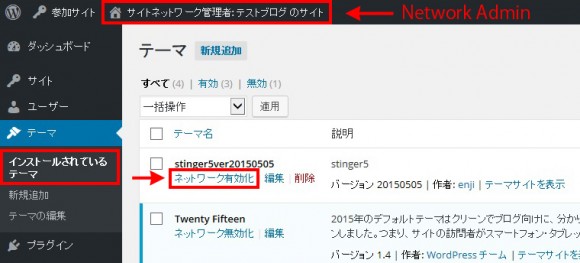
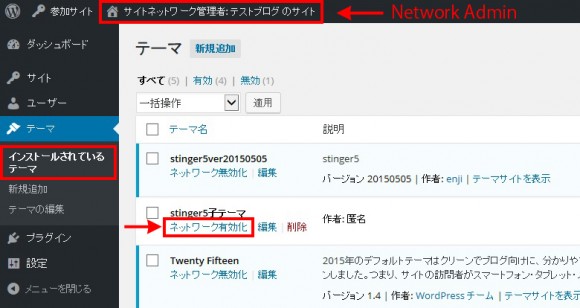
From the dashboard of the “Network Admin”, in the “Themes” → “Installed Themes” page, “Network Activate” the “Stinger5”.
- New installation of themes can be made only from the “Network Admin” screen, after setting the site network, similar to the plugins.
- And, the activation of the themes needs to be achieved by using the “Network Enable” from the “Network Admin” screen, and then using the “Activate” in each site.
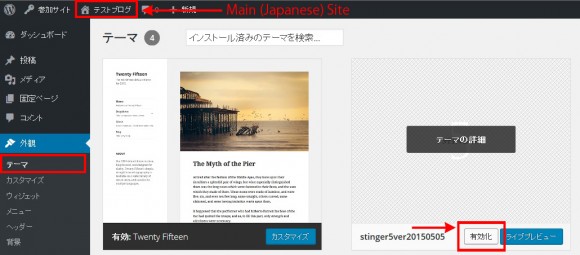
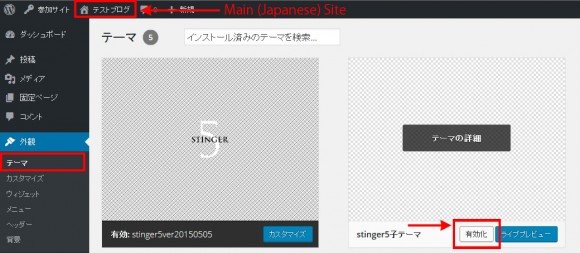
From the dashboard of the main (Japanese) site, in the “Appearance” → “Themes” page, activate “Stinger5”.
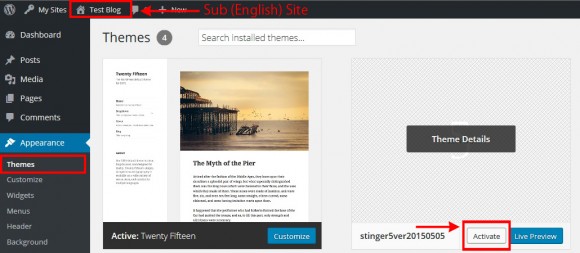
Also from the dashboard of the sub (English) site, in the “Appearance” → “Themes” page, activate “Stinger5”.
Because the “header.php” file of the WordPress theme “Stinger5” needs to be edited, backup it in advance.

The location of the “header.php” is in the folder of “a folder where you installed WordPress” → “wp-content” → “themes” → “stinger5ver2015XXXX”.
<?php if ( function_exists( 'the_msls' ) ) the_msls(); ?>
Add the above sentence (the sentence is same as the previous one) in the “header.php”.
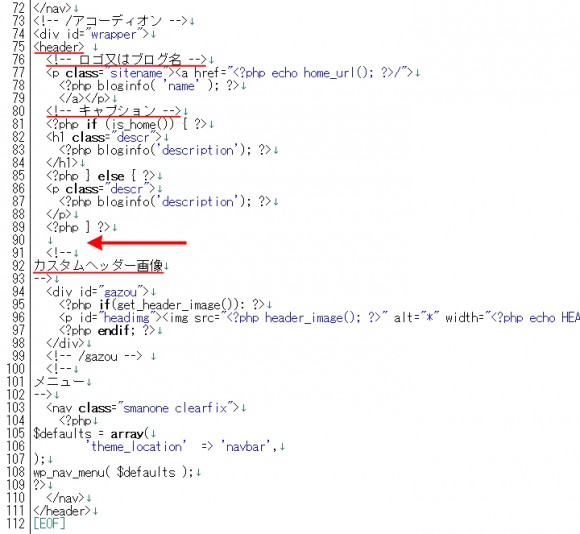
The sentence was added to the location where arrow shows in the figure above, near to the end of the “header.php”. It’s added below the <!– ロゴ又はブログ名 –> and <!– キャプション –> and above the <!– カスタムヘッダー画像 –> in the <header>.
The previous sentence was added to the above-mentioned position.
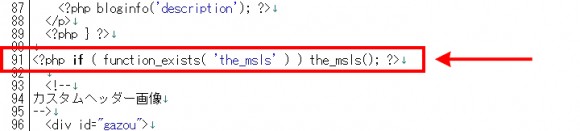
The “Language Switch” was installed in the header, below the title and the subtitle and above the header image.
Although there were no functional problems even as it was, I have added some modification to the “Language Switch” for my personal preference.
- The image size of the flags was a little enlarged.
- The image for the link to the English site is changed from the US to the British flag.
- The “Language Switch” was moved into the top right of the header, where it was blank.
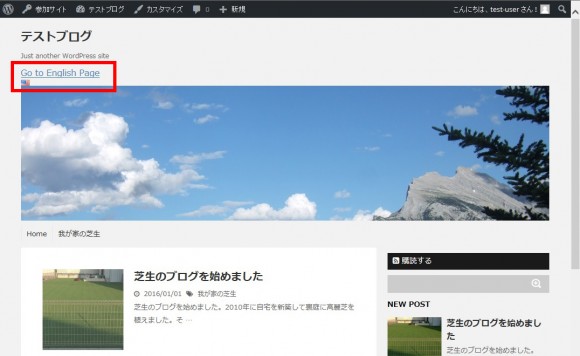
Find flag images of your preference in internet. I have downloaded from the site below this time.
商用利用も再配布も限界無しのフリー!全250種類2500個、世界各国の国旗のアイコン素材 – 2500 Flag Icon Set

In the “flags.zip” downloaded from the above-mentioned site, and then in the “flags-iso” → “shiny” → “48” folder, there are Japanese and British flags “JP.png” and “GB.png”, which were used this time.

Change the file names. It will be “JP.png” → “ja.png”, and “GB.png” → “us.png”.
Replace the image files in the “Multisite Language Switcher” folder with the above-mentioned ones. The location of the Image files is in “a folder where you installed WordPress” → “wp-content” → “plugins” → “multisite-language-switcher” → “flags” folder.
Replace Japanese flag “ja.png” with a larger image.
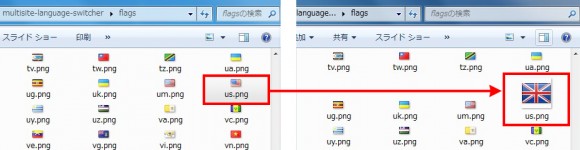
Replace US flag “us.png” with a larger British flag image.
- These procedures make flag images larger and change the image of the link to the English site from the US to the British flag.
- Although the flag image can be changed from the dashboard, in the “Settings” → “Multisite Language Switcher” page, using the setting of “Custom URL for flag-images”, I used this above mentioned easier method this time.
Then, move the “Language Switch” into the top right of the header. Edit the “header.php” file of the WordPress theme “Stinger5” again at first.
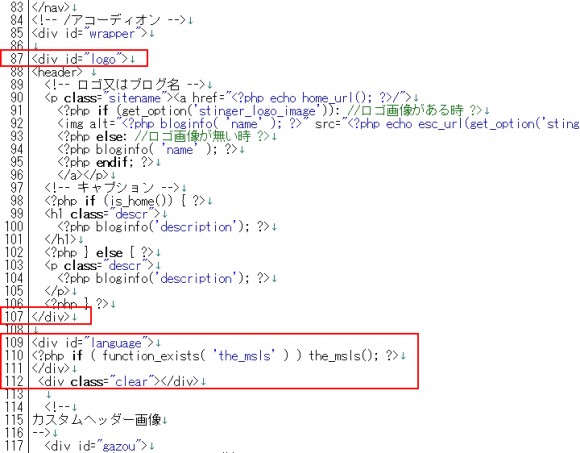
Set the id attribute of “logo” on the <!– ロゴ又はブログ名 –> and <!– キャプション –> in the <header>. Add the description of <div id=“logo”> and </div> in the place indicated by the red boxes in above figure.
- I think the position of the starting tag <div id=”logo”> can be actually below the line of <header>. But it makes the text of the Language Switch “Go to English Page” changed in white, which is difficult to be recognized. Please teach me if somebody knows the resolution.
In the same “header.php” file, replace the sentence of <?php if ( function_exists( ‘the_msls’ ) ) the_msls(); ?> with below.
<div id="language">
<?php if ( function_exists( 'the_msls' ) ) the_msls(); ?>
</div>
<div class="clear"></div>
It’s the position of the red box in the previous figure.
Change the style for id of “logo” and “language” in the “style.css”. Create the child theme of “Stinger5” for this purpose.
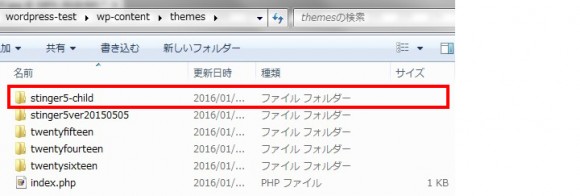
Creating a child theme folder “stinger5-child” in the “theme” folder. The location of the theme folder is “a folder where you installed WordPress” → “wp-content” → “themes”.
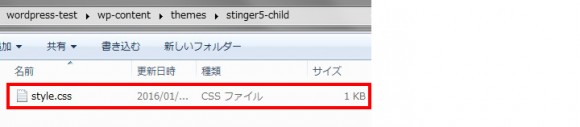
Create a new “style.css” file in the child theme folder “stinger5-child”.
Describe as follows in the above-mentioned new “style.css” file.
@charset "UTF-8";
/*---------------------------------------------------------
Theme Name: stinger5子テーマ
Template: stinger5ver2015XXXX
---------------------------------------------------------*/

@import url("../stinger5ver2015XXXX/style.css");

/*レイアウト スマートフォン
----------------------------------------------------*/
#language { text-align: center; }
#language img { width: auto; margin: 0 auto; }

/*media Queries タブレットサイズ
----------------------------------------------------*/
@media only screen and (min-width: 380px) {
#logo { float: left; }
#language { margin-top: 10px; float: right; }
#language img { margin-right: 0; }
/*-- ここまで --*/
}
In the part of “stinger5ver2015XXXX” in the lines 4 and 7, change the date into that of the currently used version.
From the “Network admin” dashboard, open the “Themes” → “Installed Themes” page, and “Network Activate” the “stinger5子テーマ(=child-theme)”
- The activation of the child theme needs to be achieved by using the “Network Enable” from the “Network Admin” screen, and then using the “Activate” in each site, after setting the site network. It is same as for the themes.
From the dashboard of the main (Japanese) site, in the “Appearance” → “Themes” page, ”Activate” the “stinger5子テーマ(=child-theme)”.
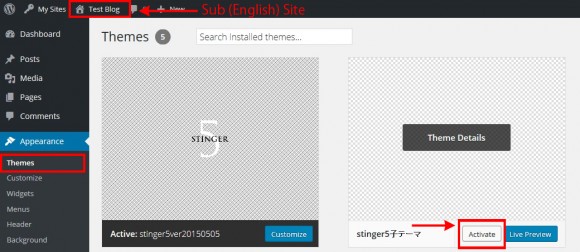
Also from the dashboard of the sub (English) site, in the “Appearance” → “Themes” page, ”Activate” the “stinger5子テーマ(=child-theme)”.
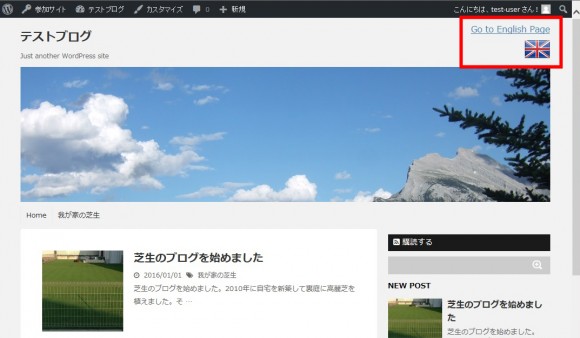
Flag images and display position of the “Language Switcher” have been changed. That’s all. It is completed now.
Delete the “/blog” in the Permalink of the “Main Site (Japanese Site)”
Though it had been once completed by the above procedures, then link error started to occur when I clicked on the “Go to Japanese Page” from the posted articles in the English site. The cause was that the “/blog” was added to the permalink of the main (Japanese) site automatically. This problem was solved by deleting the “/blog” in the permalink, referring the following site.
親サイトのパーマリンクの「/blog」を消す方法[マルチサイト,WordPress]